
We love using grow tents as they provide an endless growing season for plants. However, do you know that a poorly ventilated grow tent can lead to diseases, mold, and mildew? Knowing how to effectively ventilate your grow tent is essential to keeping your plants healthy and free from pests.
Here are five tips on how to ventilate grow tents:
- Use oscillating fans in your grow tent.
- Open your tent’s ventilation flaps.
- Open the grow tent door.
- Install a vent with an exhaust fan in your grow tent.
- Use carbon filters in your tent.
A grow tent is beneficial because you can control the internal conditions to keep your crops growing healthily. One of the critical conditions for healthy plants is keeping your ventilation levels conducive to growth. Read on to discover five ways to ventilate your grow tent.
1. Use Oscillating Fans in Your Grow Tent
Oscillating fans help circulate the air in the grow tent and prevent stagnant air pockets from forming. You can place oscillating fans in two locations for efficiency:
- Inside the grow tent.
- Outside the grow tent.
Oscillating Fans Inside the Grow Tent
Oscillating fans inside the grow tent work by circulating the air and keeping the temperature and humidity levels even.
Although one oscillating fan inside the grow tent can work well, it’s advisable to have at least two fans.
You should arrange the two fans in the following way:
- Place the first fan above the plants using hangers to keep it out of the way. This placement will allow you to utilize your limited floor space fully.
- Place the second oscillating fan on the floor near the entrance of the grow tent. The fan should not point directly toward the plants. An oscillating fan pointing directly towards your plants exposes them to wind burn.
Placing one fan above the plants and another near the entrance of the grow room will ensure efficient fresh air circulation throughout the tent. As a result, your plants get sufficient carbon dioxide they need for photosynthesis.
Oscillating Fans Outside the Grow Tent
These fans work by pulling fresh air into the grow tent and pushing out hot, stuffy air. For this to happen, you need to connect a duct at the top corner of the tent. For the fans to work efficiently outside the tent, you should follow these tips:
- When placing oscillating fans outside the grow tent, make sure they’re not too close to the grow tent. You don’t want the fans to blow directly into the tent as this can disturb your plants and dry out the soil.
- The best place to put oscillating fans outside the grow room is on either side of the tent, about a foot away. This way, the fans will draw fresh air into the sides of the tent. The air then moves inside, aided by the pressure difference between the inside and outside of the tent.
- You can also use a combination of both inside and outside oscillating fans for even better circulation. In this way, you can optimize both external and internal airflow benefits.
Air Extractor System
It’s worth noting that oscillating fans don’t work alone; you need an air extraction system to create airflow. This system sucks out the old air and brings in new fresh air required by plants to thrive.
The most common type of air extraction system is the inline fan. Inline fans are placed inside the grow tent and connected to an exhaust vent. These fans pull hot, stuffy air out of the grow room and push it out through the vent.
The air extractor system should replace the inside air at least every three to five minutes for efficiency.
2. Open Your Tent’s Ventilation Flaps
If your grow tent remains sealed, the level of CO2 inside drops significantly, which can lead to stunted growth.
Most grow tents come with at least two vents located on either side of the tent to ensure efficient ventilation and CO2 regulation. These flaps serve three purposes:
- Adjusting humidity inside the tent.
- Changing pressure inside the tent.
- Ensuring optimal temperature for the survival of crops.
It’s worth noting that the flaps can only perform these functions if opened periodically.
You should open the vents of your grow tent for a few minutes every hour to allow fresh air to enter and old, humid air to escape.
Not only does this prevent your plants from experiencing too hot or too cold conditions, but it also helps regulate the amount of CO2 they absorb.
The only challenge with opening ventilation flaps is that they leak light. However, you can solve this by either:
- Taping the flaps shut until it’s time to open them.
- Installing blackout curtains over the vents.
3. Opening the Grow Tent Door
If you don’t have enough capital to invest in fans, opening the tent door can be an excellent way to ventilate your grow tent.
Opening the tent door allows fresh air inside and the old, stuffy air to escape. Apart from ensuring free air circulation, an open tent door ensures the tent has sufficient CO2 by letting out the excess. A study by Stanford University reveals that too much carbon dioxide can also lead to stunted growth in plants.
An open door also helps regulate the temperature and humidity inside the tent, which is essential for the health of your plants.
However, you should only open the door for a few hours during the day as too much light can harm your plants.
The best time to open the door is in the morning when the sun isn’t too intense.
You can also open the door in the evening. However, it should be closed before dawn as the temperature drops significantly.
4. Install a Vent with an Exhaust Fan in Your Grow Tent
This option works well with 5′ x 5′ (1.52 x 1.52 m) and 4′ x 8′ (1.21 x 2.43 m) grow tents. The exhaust fan extracts hot and stuff air from the grow tent while pulling fresh air from outside through the vent into the tent.
This option works well if appropriately installed as an active way to ventilate your tent. I will take you through a step-by-step guide on how to install a vent with an exhaust fan below:
Equipment Needed
- Tape measure.
- Scissors.
- Drill.
- ¾-inch hole saw.
- Plywood (optional).
- Exhaust fan.
- Flexible ducting.
Procedure
- Determine where you want to place the vent. It’s best to put it near the top of the tent so that the hot air can draw out easily.
- Use a tape measure to mark the center of the spot with a pencil. Planning is essential as you don’t want to make more than one hole due to placing errors.
- Use a ¾-inch hole saw to cut a hole in the center of the marked spot. If you’re using plywood, cut a hole in it as well.
- Attach the exhaust fan to the hole you just cut using screws. If you’re using plywood, attach it to the fan now.
- Use flexible ducting to connect the fan to the vent. Make sure that the ducting is airtight so that there are no leaks.
- Turn on the fan and check to see if it’s working correctly. If everything is in order, close the hole using weatherstripping or duct tape.
Watch the video below if you want more guidance on the above procedure:
This setup is excellent because it uses the exhaust fan in the following ways:
- Pulling stale air from the grow tent.
- Scrubbing the odors within the grow tent.
- Removing excess heat from the grow tent.
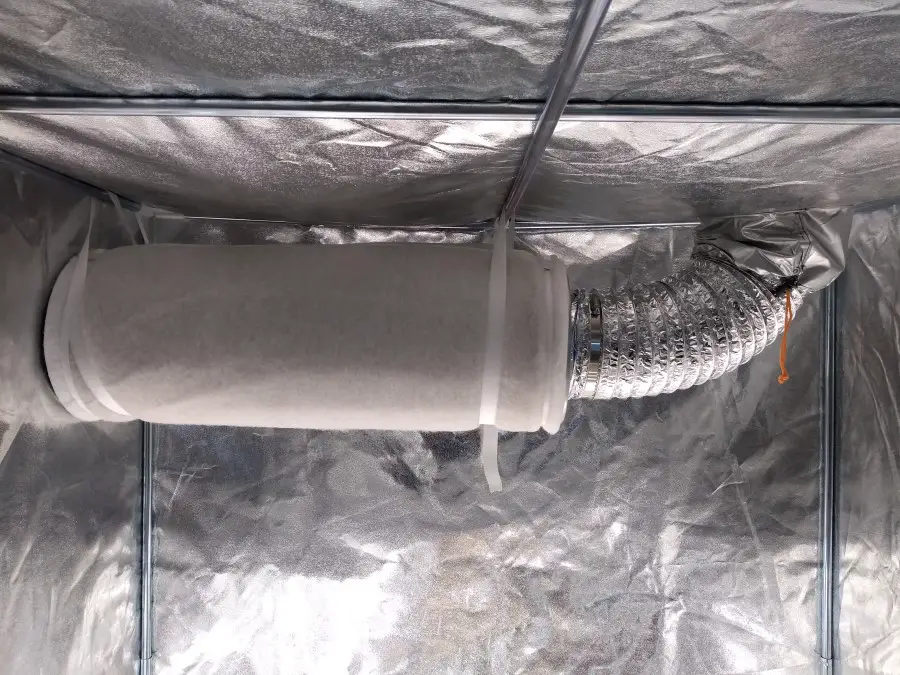

5. Use Carbon Filters in Your Grow Tent
Carbon filters are an excellent way to remove smells from your grow tent.
Not only do they eliminate odors, but they also help to regulate the humidity and temperature levels inside the grow tent.
Carbon filters ensure that the air entering the tent is clean when used with a vent and exhaust fan. It also maintains optimal humidity in the grow tent.
Installing a Carbon Filter in Your Grow Tent
Before installing a carbon filter, you must have the right size for your grow tent. The size of an appropriate carbon filter for a grow tent is determined by the tent’s size and the cubic feet per minute (CFM) of the exhaust fan, as demonstrated below:
- Get the cubic feet of your grow tent by multiplying its dimension. For instance, 4′ x 8′ x 5′ = 160 cubic feet.
- Multiply the cubic feet calculated in step 1 above by the exchange rate (the number of times you want the air exchanged per hour). In most cases you’ll want the air to be renewed at least one time every 5 minutes or 12 times an hour. So, use an exchange rate of 12 multiplied by the cubic feet. 160 x 12 = 1,920.
- Divide your result in step 2 by 60, which represents 60 minutes in an hour, to get your CFM (1,920/60) = 32. This figure will show you which size filter you will need to buy.
- Buy a carbon filter that meets or exceeds your calculated CFM, in this case, 32. Buying the correct size filter is essential for the filter to work efficiently.
Setting Up the Carbon Filter
Now that you have the right filter for your grow tent, it’s time to install it. Below is a step-by-step guide for this:
- Connect the filter to the grow tent fan.
- Connect a ducting to the carbon filter.
- Use duct clamps to seal the ducting and make it air tight.
- Place the set-up near or above your plants.
- Strategically locate the fan in a way that it extracts air from the tent into the carbon filter.
Benefits of Ventilation in a Grow Tent
A grow tent should have similar growing conditions as those in nature. It must ensure your plants have enough carbon dioxide and optimal humidity and temperature for photosynthesis. Ventilation helps achieve this by:
- Controlling humidity: According to the National Center for Biotechnology Information, ventilation lowers indoor moisture levels preventing the growth of microorganisms like mold.
- Maintaining optimal carbon dioxide: For photosynthesis to occur, your plants need carbon dioxide. While the air inside a grow tent has some carbon dioxide, it’s not enough for optimal growth. Ventilation helps to replenish the level of carbon dioxide in a grow tent.
- Regulating temperature: By drawing out hot air and pulling in cooler air from outside, ventilation helps maintain a stable temperature inside the grow tent.
Closing Thoughts
Ventilation is essential in a grow tent because it maintains optimal humidity and temperature while replenishing carbon dioxide levels. Although there are several ways to ventilate your grow tent, keep the following in mind:
- The size of your grow tent determines the number of fans you’ll need. The larger the tent, the more fans.
- Seal the fans properly to avoid any leaks.
- Ensure the carbon filter you buy can handle the CFM (cubic feet per minute) of your exhaust fan.